This tutorial will teach you how to draw lines, circles, and text on any image using OpenCV with Python.
Project Structure
Before we get started implementing our Python script for this tutorial, let’s first review our project directory structure:
 →
→ 1 2 3 4 5 6 | $ tree . --dirsfirst . ├── elon_musk_tesla.png └── opencv_image_drawing.py 0 directories, 2 files |
The directory contains :
- Our Python script file
opencv_image_drawing.py. - Our experimental image,
elon_musk_tesla.png.
Let’s now implement our opencv_image_drawing.py Python script using OpenCV!
Implementing the Drawing OpenCV Script
First, make a new script, naming it opencv_image_drawing.py, and insert the following code:
1 2 3 4 5 6 7 8 | # import the necessary packages import argparse import cv2 # initialize the argument parser and establish the arguments required parser = argparse.ArgumentParser() parser.add_argument('--image', required=True, help='Path to image') args = vars(parser.parse_args()) |
In Lines 2 – 3, we imported OpenCV to work with our sample image and the argparse library to execute our program via the command line. After the imports, we then parse a single command-line argument (lines 6 – 8):
-
--image, which is the path to where our image resides on disk.
Adding Rectangles using OpenCV
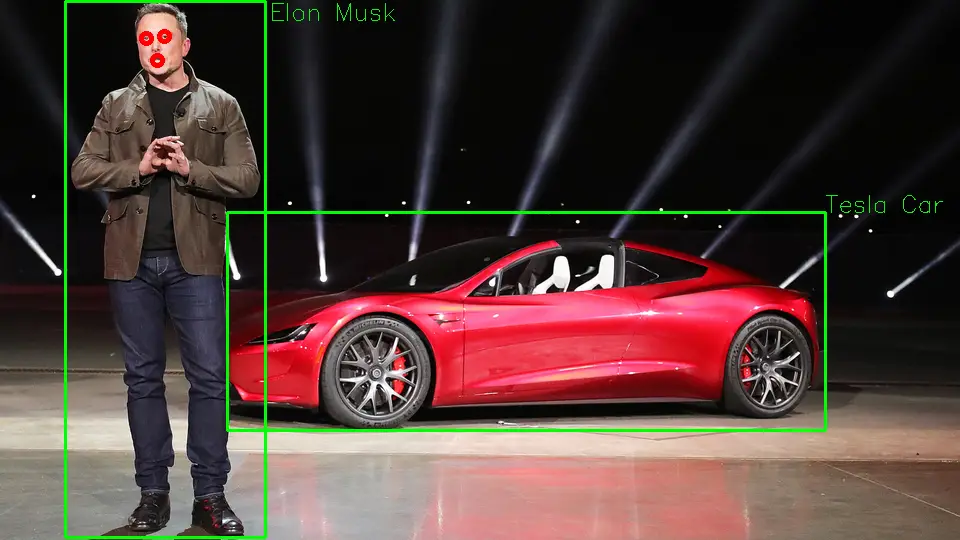
11 12 13 14 15 16 17 18 19 20 | # load the image specified in the command line image = cv2.imread(args['image']) cv2.imshow("Original", image) cv2.waitKey(0) # draw a rectangle on the image cv2.rectangle(image, (65, 1), (265, 537), (0, 255, 0), 2) # elon musk cv2.rectangle(image, (227, 212), (825, 430), (0, 255, 0), 2) # tesla car cv2.imshow("Image - Added Rectangles", image) cv2.waitKey(0) |
First, we will instruct OpenCV to go and find the image "elon_musk_tesla.png", read it, and then store it in this variable "image".
On-Line 17 and 18, we will use the cv2.rectangle method to draw a bounding box on “Elon Musk” and the “Tesla Vehicle”. For this to be possible, we will provide the cv2.rectangle parameter with the following argument. Let’s explore each of them:
- The first argument is the image on which we wish to draw our rectangle. We want to draw on the sample image we loaded; that’s why it’s passed into the method.
- The second argument is our starting (x,y) position of our rectangle – here, we both used (65,1) and (227,212).
- After that, we must give the rectangle a terminating (x,y) point. We chose to end our rectangles at (265, 537) and (825, 430).
- We also need to supply the rectangle’s color we wish to draw in the final image.
Finally, OpenCV also provides an optional parameter to specify the thickness of the rectangle.

Adding Labels onto Images using OpenCV
23 24 25 26 27 28 29 | # add a label to the tesla car and elon musk bounding box image = cv2.putText(image, 'Elon Musk', (269, 20), cv2.FONT_HERSHEY_SIMPLEX, 0.8, (0, 255, 0), 1) image = cv2.putText(image, 'Tesla Car', (825, 212), cv2.FONT_HERSHEY_SIMPLEX, 0.8, (0, 255, 0), 1) cv2.imshow("Image - Added Text", image) cv2.waitKey(0) |
We’ve simply sketched the outline of a rectangle up to this point. Now, how can we add labels beside each rectangle drawn?
Well, we have to provide the following arguments:
- The first parameter is the image from which we want the text to be drawn.
- The second parameter is the text String to be drawn on the loaded image.
- The third parameter is the bottom left corner of the text, represented by the (x,y) coordinate.
- The fourth is the font type to be used. Here we specified
cv2.FONT_HERSHEY_SIMPLEX - The fifth is the font scaling factor. I’ll recommend you play around with this parameter to get a great understanding of how different values impacts the size of the font (usually, the smaller the value, the smaller the font size, and vice-versa).
- Then we have the color of the text string to be drawn.
Finally, OpenCV also provides an optional parameter to specify the thickness of the text.

Adding Circles using OpenCV
32 33 34 35 36 37 | # add circles to both his left and right eye along with his mouth cv2.circle(image, (146, 38), 5, (0, 0, 255), 2) # left eye cv2.circle(image, (164, 36), 5, (0, 0, 255), 2) # right eye cv2.circle(image, (157, 60), 7, (0, 0, 255), 2) # mouth cv2.imshow("Image - Added Circles", image) cv2.waitKey(0) |
Up until this point, we have only explored drawing rectangles and adding text into the image. That’s all great – but what about circles?
How can we possibly use OpenCV to draw circles?
Well, drawing circles is as simple as drawing rectangles; however, it differs a bit with the function arguments:
- The first parameter takes the image on which the circle should be drawn.
- Next, the point around which we will draw our circle must subsequently be provided. We pass in a tuple of (x,y) values to draw a circle on both the left and right eye, along with the mouth.
- The third argument is the radius of the circle we want to draw.
- Finally, we provide the color of our circle, which in this case is red.
Note: OpenCV also provides an optional parameter to specify the thickness of the circle.
Then, we will show our image and then wait for a keypress on the keyboard.
Displaying OpenCV Loaded Image
Please start by entering your email in the blue popup to retrieve the source code and example images from my private repository or sign up directly from using the link.
Now that’s implemented, it’s time to run our script. So, fire up your terminal, and execute the following command:
1 2 | $ python3 opencv_image_drawing.py --image images/elon_musk_tesla.png $ |
Summary
This article has explained how to use OpenCV to draw upon images using the:
cv2.rectanglemethod.cv2.circlemethod.cv2.putTextmethod, using Python.
What’s Next?
Now, what’s next? in the following tutorial, we will explore the library OpenCV’s functionalities. Until then, share, like the video above, comment, and subscribe.
Further Reading
We have listed some useful resources below if you thirst for more reading.
- How to Split an Image into 4 Pieces OpenCV
- How to Read and Display an Image using OpenCV
- 3 Rookie Mistakes People Make Installing OpenCV | Avoid It!
- Why Google and Microsoft uses OpenCV
- A Simple Walk-through with NumPy for Data Science
- A Simple Walk-through with Matplotlib for Data Science
- Why is Python the most popular language for Data Science


