I built a real-time emotion detection system using PyTorch and OpenCV. And today, we’re going to test it on 2 different players reacting to the Novak Djokovic visa ban in Australia. If you want to learn how to build it from scratch, stick with me until to end of this tutorial.
In this tutorial, you will learn how to use the trained model from previous blogpost, to analysis the constant fluid state of human emotions reacting Novak Djorkovic visa ban in Australia in video formatted files.
This tutorial is the second series on Real-Time Emotion Detection system with PyTorch and OpenCV.
- Training an Emotion Detection System from Scratch using PyTorch (previous tutorial)
- Real-time Emotion Detection using PyTorch and OpenCV (this tutorial)
Let’s now configure our environment.
Configuring your Development Environment
To successfully follow this tutorial, you’ll need to have the necessary libraries: PyTorch, OpenCV, scikit-learn and other libraries installed on your system or virtual environment.
Good thing you don’t have to worry too much about OpenCV and scikit-learn installation techniques, as I’ve covered them in this tutorial here. Mostly for Linux users. As you can easily pip install them, and you’re ready to go.
However, if you are configuring your development environment for PyTorch specifically, I recommend you follow their Installation guild on their website. Trust me when I say it’s easy to use, and you’re ready to go asap.
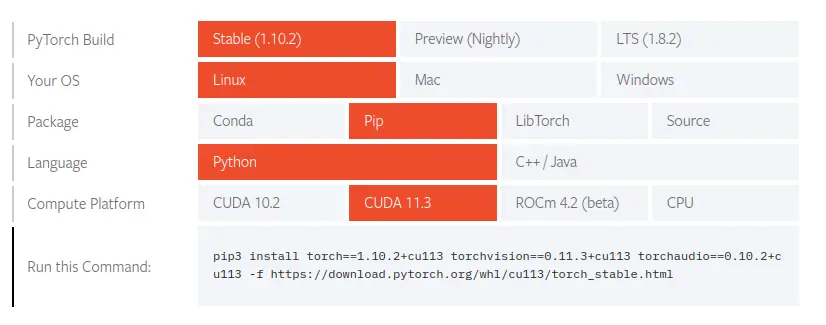
All that’s required of you is to select your preferences and run the install command inside of your virtual environment, via the terminal.
Project Structure
Before we get started implementing our Python script for this tutorial, let’s first review our project directory structure:
 →
→ 1 2 3 4 5 6 7 8 9 10 11 12 13 14 15 16 17 18 19 20 21 | $ tree . --dirsfirst . ├── dataset │ ├── test [6 categories] │ └── train [6 categories] ├── model │ ├── deploy.prototxt.txt │ └── res10_300x300_ssd_iter_140000_fp16.caffemodel ├── neuraspike │ ├── __init__.py │ ├── config.py │ ├── emotionNet.py │ └── utils.py ├── output │ ├── model.pth │ └── plot.png ├── emotion_detection.py ├── requirements.txt └── train.py 4 directories, 11 files |
We have two Python script to review today:
utils.py:This contains additional method to resize our video frame.emotion_recognition.py:Loads our trained model from disk, makes predictions on different facial expression from videos, and displays the results on our screen
Let’s have a look inside these scripts:
Utils.py
78 79 80 81 82 83 84 85 86 87 88 89 90 91 92 93 94 95 96 97 98 99 100 | def resize_image(image, width=None, height=None, inter=cv2.INTER_AREA): # check if the width and height is specified if width is None and height is None: return image # initialize the dimension of the image and grab the # width and height of the image dimension = None (h, w) = image.shape[:2] # calculate the ratio of the height and # construct the new dimension if height is not None: ratio = height / float(h) dimension = (int(w * ratio), height) else: ratio = width / float(w) dimension = (width, int(h * ratio)) # resize the image resized_image = cv2.resize(image, dimension, interpolation=inter) return resized_image |
This script contains a resize function already implemented which resizes each video frame while preserving the aspect ratio of the individual image. You can learn more about this code snippet via this video/ blog tutorial, I’ve prepared for you already. Moving on!
Implementing the Real-Time Emotion Detection System Script
1 2 3 4 5 6 7 8 9 10 11 12 13 14 15 16 17 18 19 20 21 22 23 24 25 26 27 | # import the necessary libraries from torchvision.transforms import ToPILImage from torchvision.transforms import Grayscale from torchvision.transforms import ToTensor from torchvision.transforms import Resize from torchvision import transforms from neuraspike import EmotionNet import torch.nn.functional as nnf from neuraspike import utils import numpy as np import argparse import torch import cv2 # initialize the argument parser and establish the arguments required parser = argparse.ArgumentParser() parser.add_argument("-i", "--video", type=str, required=True, help="path to the video file/ webcam") parser.add_argument("-m", "--model", type=str, required=True, help="path to the trained model") parser.add_argument('-p', '--prototxt', type=str, required=True, help='Path to deployed prototxt.txt model architecture file') parser.add_argument('-c', '--caffemodel', type=str, required=True, help='Path to Caffe model containing the weights') parser.add_argument("-conf", "--confidence", type=int, default=0.5, help="the minimum probability to filter out weak detection") args = vars(parser.parse_args()) |
We began importing our required Python packages (Lines 2 – 13). Then from there, we parsed our command-line arguments. Our emotion_detection.py script requires 5 arguments:
--video: The path to the video file we want to run the detection upon.--model: The path to the trained model we’ve seen in the previous tutorial.--prototxt: The path to the deployed prototxt.txt model architecture file.--caffemodel: The path to the Caffe model containing the model’s weights.--confidence: The minimum probability set to filter out weak detection for faces.
After we have our arguments defined (Lines 15 – 27), let’s move on to loading our face detection model, emotion detection model, and configuring our video-steam so our trained model can make real-time predictions for us:
29 30 31 32 33 34 35 36 37 38 39 40 41 42 43 44 45 46 47 48 49 50 51 52 53 | # load our serialized model from disk print("[INFO] loading model...") net = cv2.dnn.readNetFromCaffe(args['prototxt'], args['caffemodel']) # check if gpu is available or not device = "cuda" if torch.cuda.is_available() else "cpu" # dictionary mapping for different outputs emotion_dict = {0: "Angry", 1: "Fearful", 2: "Happy", 3: "Neutral", 4: "Sad", 5: "Surprised"} # load the emotionNet weights model = EmotionNet(num_of_channels=1, num_of_classes=len(emotion_dict)) model_weights = torch.load(args["model"]) model.load_state_dict(model_weights) model.to(device) model.eval() # initialize a list of preprocessing steps to apply on each image during runtime data_transform = transforms.Compose([ ToPILImage(), Grayscale(num_output_channels=1), Resize((48, 48)), ToTensor() ]) |
Line 31, we load the face detection model using the --prototxt and --caffemodel files, and line 34 checks which device is available to utilize when training our model, either the CPU or GPU.
Line 37 – 38, we initialize the mapping to different target labels in a Python dictionary.
Then we load the model weights from the EmotionNet we created in the previous tutorial and call them to(device) to move the model to be either on our CPU or GPU and set the model to evaluation mode (Lines 41– 45).
To preprocess our dataset before feeding it towards the model, we called the Compose instance from torchvision.transforms module on Lines 48– 53, to take the detected face, convert it into a PIL format; into grayscale; perform a resize, and then set it to tensors.
55 56 57 58 59 60 61 62 63 64 65 66 67 68 69 70 71 72 73 74 75 76 77 78 79 80 81 82 | # initialize the video stream vs = cv2.VideoCapture(args['video']) # iterate over frames from the video file stream while True: # read the next frame from the input stream (grabbed, frame) = vs.read() # check there's any frame to be grabbed from the steam if not grabbed: break # clone the current frame, convert it from BGR into RGB frame = utils.resize_image(frame, width=1500, height=1500) output = frame.copy() frame = cv2.cvtColor(frame, cv2.COLOR_BGR2RGB) # initialize an empty canvas to output the probability distributions canvas = np.zeros((300, 300, 3), dtype="uint8") # get the frame dimension, resize it and convert it to a blob (h, w) = frame.shape[:2] blob = cv2.dnn.blobFromImage(frame, 1.0, (300, 300)) # infer the blog through the network to get the detections and predictions net.setInput(blob) detections = net.forward() |
To begin, let’s initialize our video steam which takes as an input the path to the video file (Line 56), grab any frame from the VideoCapture (Line 62); check if there’s any frame to be read (Lines 65 – 66). Resize the original video frame into 1500×1500 pixels (Line 69); made a copy of the image (Line 70), before reversing the color channel from BGR to RGB (Line 71).
On Line 74, we instantiate a 300×300 canvas filled with zeros of type uint8, where the output probabilities will be displayed to help us understand the emotion state of the players.
From Lines 77– 78, we grabbed the image’s width and height and converted the current frame into a blob using the cv2.dnn module.
Next, we set the generated blob as an input into the neural network loaded (Line 81) and then apply OpenCV’s deep learning-based face detector to find the number of faces in the input image (Line 82).
84 85 86 87 88 89 90 91 92 93 94 95 96 | # iterate over the detections for i in range(0, detections.shape[2]): # grab the confidence associated with the model's prediction confidence = detections[0, 0, i, 2] # eliminate weak detections, ensuring the confidence is greater # than the minimum confidence pre-defined if confidence > args['confidence']: # compute the (x,y) coordinates (int) of the bounding box for the face box = detections[0, 0, i, 3:7] * np.array([w, h, w, h]) (start_x, start_y, end_x, end_y) = box.astype("int") |
After we’ve been able to detect and localize faces, we’ll iterate through detections and grab the confidence to filter out weak faces below the minimum confidence set (Lines 85– 92). Then exact only the regions of interest (the faces) and multiple the (x, y, w, h) by the width and height, making sure the spatial dimension is large for the proceeding steps (Lines 95– 96).
Now it’s time to activate our emotion detection algorithm for inference:
98 99 100 101 102 103 104 105 106 107 108 109 110 111 112 113 114 115 116 | # grab the region of interest within the image (the face), # apply a data transform to fit the exact method our network was trained, # add a new dimension (C, H, W) => (N, C, H, W) and send it to the device face = frame[start_y:end_y, start_x:end_x] face = data_transform(face) face = face.unsqueeze(0) face = face.to(device) # infer the face (roi) into our pretrained model and compute the # probability score and class for each face and grab the readable # emotion detection predictions = model(face) prob = nnf.softmax(predictions, dim=1) top_p, top_class = prob.topk(1, dim=1) top_p, top_class = top_p.item(), top_class.item() # grab the list of predictions along with their associated labels emotion_prob = [p.item() for p in prob[0]] emotion_value = emotion_dict.values() |
Lines 101 – 104 crops out the region on interest (the face), apply the preprocessing steps onto the image, add a new dimension (C, H, W) => (N, C, H, W), and send the image to any available device.
Then to get the model’s predictions, Lines 109 – 112 outputs the predictions of the model, which is converted into probabilities.
Now it’s time to get the probabilities of different emotional states of the top tennis players.
118 119 120 121 122 123 124 125 126 127 128 129 130 131 132 133 134 135 136 137 138 139 140 141 142 143 144 145 146 147 | # draw the probability distribution on an empty canvas initialized for (i, (emotion, prob)) in enumerate(zip(emotion_value, emotion_prob)): prob_text = f"{emotion}: {prob * 100:.2f}%" width = int(prob * 300) cv2.rectangle(canvas, (5, (i * 50) + 5), (width, (i * 50) + 50), (0, 0, 255), -1) cv2.putText(canvas, prob_text, (5, (i * 50) + 30), cv2.FONT_HERSHEY_SIMPLEX, 0.5, (255, 255, 255), 2) # draw the bounding box of the face along with the associated emotion # and probability face_emotion = emotion_dict[top_class] face_text = f"{face_emotion}: {top_p * 100:.2f}%" cv2.rectangle(output, (start_x, start_y), (end_x, end_y), (0, 255, 0), 2) y = start_y - 10 if start_y - 10 > 10 else start_y + 10 cv2.putText(output, face_text, (start_x, y), cv2.FONT_HERSHEY_SIMPLEX, 1.05, (0, 255, 0), 2) # display the output to our screen cv2.imshow("Face", output) cv2.imshow("Emotion probability distribution", canvas) # break the loop if the `q` key is pressed key = cv2.waitKey(1) & 0xFF if key == ord("q"): break # destroy all opened frame and clean up the video-steam cv2.destroyAllWindows() vs.release() |
To understand the human expressions to any given situation, we can’t just label or interpret the feeling of anyone based on a given output because as i mentioned earlier in the previous tutorial, we as human, our emotions are in a constant fluid state. As based on certain situation, we can have mixture emotion.
So rather than assign a single label or output to a given frame, it’s much better to represent the results in form of probabilities by displaying a bar chart of the fixed emotions we want to detect along with it’s probabilities values, that can later be study as a research task (Lines 118 – 134).
To round up with the emotion_detection.py script, we display both the original video frame and the frame which contains probability values. Then wait for a “q” key to be pressed on the keyboard to terminate any stated video analysis, close any open video, and stop any pointers (Lines 137 – 147).
Display OpenCV Flip Result
Now that’s implemented, it’s time to run our script. So, fire up your terminal, and execute the following command:
1 2 3 | $ python3 emotion_recognition.py -i video/novak_djokovic.mp4 --model output/model.pth \ $ --prototxt model/deploy.prototxt.txt \ $ --caffemodel model/res10_300x300_ssd_iter_140000_fp16.caffemodel |
The output we’ll get should match the short video you can see in this video clip.
Summary
In this tutorial, you learnt how to use the trained model from the previous tutorial, to perform infer on real-time video steams using PyTorch and OpenCV.
What’s Next?
Now, what’s next? in the following tutorial, we will explore the library OpenCV’s functionalities. Until then, share, like the video above, comment, and subscribe.
Further Reading
We have listed some useful resources below if you thirst for more reading.
- Training an Emotion Detection System using PyTorch
- How to Properly Resize an Image with Python using OpenCV
- What You Don’t Know About Machine Learning Could Hurt You
- Linear Regression using Stochastic Gradient Descent in Python
- 3 Rookie Mistakes People Make Installing OpenCV | Avoid It!
- Why is Python the most popular language for Data Science
- A Simple Walk-through with NumPy for Data Science
- Why Google and Microsoft uses OpenCV


