This tutorial will teach you how to resize an image with Python and OpenCV using the cv2.resize function. Let’s get started.
What is Resizing and Why should you consider the Aspect Ratio ?
Resizing, or also known as scaling refers to the process of either increasing or decreasing the size of an image in response to it’s width and height.
Most of the times, a common mistake people make when resizing is neglecting the aspect ratio — which is the ratio of an image’s width to its height. And not having this in mind, can lead to having a squished or compressed image:
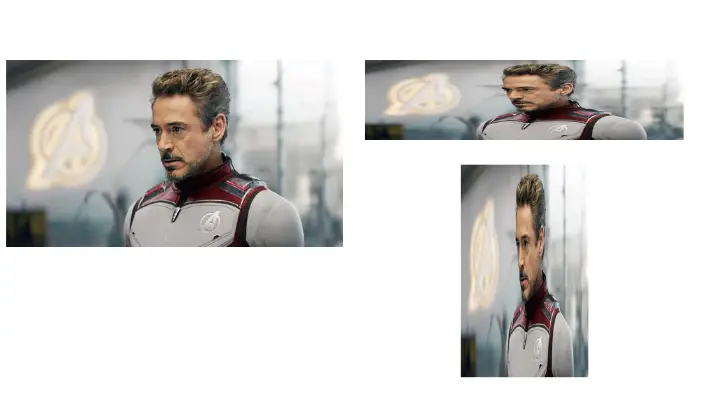
On the left, we have our original image. And on the right, we have both of the resized images without considering the aspect ratio of the image. That’s why you can see the image is been stretch either along the $ x $- axis or along the $ y $ – axis.
Apart from the aspect ratio, we also need to keep in mind, what interpolation method to use when resizing the image.
As increasing the size of the pixels requires us to fill in the gaps of pixels we don’t even know exists. And decreasing the size of the image leaves us with fewer pixels to process which saves time when working with image processing algorithms or deep learning models.
Project Structure
Before we get started implementing our Python script for this tutorial, let’s first review our project directory structure:
 →
→ 1 2 3 4 5 6 | $ tree . --dirsfirst . ├── opencv_resize.py └── tony_stark.jpg 0 directories, 2 files |
The directory contains :
- Our Python script file
opencv_resize.py. - Our experimental image,
tony_shark.jpg.
Let’s now implement our opencv_resize.py
Implementing the Image Resize Script
First, make a new script, naming it opencv_resize.py, and insert the following code:
1 2 3 4 5 6 7 8 | # import the necessary packages import argparse import cv2 # initialize the argument parser and establish the arguments required parser = argparse.ArgumentParser() parser.add_argument('--image', required=True, help='Path to image') args = vars(parser.parse_args()) |
Let’s import our required Python packages — all we need is cv2 for our OpenCV bindings and argparse for command-line arguments (lines 2 – 3). Here we only need a single argument, --image, to specify where the input image is located (lines 6 – 8).
11 12 13 14 15 16 17 18 19 20 21 22 23 24 | # load the image and show it on screen image = cv2.imread(args['image']) cv2.imshow("Image", image) cv2.waitKey(0) # resize the image to be 600 pixels wide by calculating the # ratio of the new width compared to the old width ratio = 600.0 / image.shape[1] dimension = (600, int(image.shape[0] * ratio)) # resize the original image resizedImage = cv2.resize(image, dimension, interpolation=cv2.INTER_AREA) cv2.imshow("Resized Image - Width", resizedImage) cv2.waitKey(0) |
First, we will instruct OpenCV to go and find the image "tony_shark.jpg", read it, and then store it in this variable "image". Then later, display the output towards our screen.

Now to resize the image, we must keep in mind preserving the aspect ratio. Which is the relationship between the image’s width and its height:
aspect_ratio = image_width / image_height
As you have seen, our image will look distorted if we ignore the image’s aspect ratio while resizing (see Figure 1).
To resize the image by setting the width, all that is required is to compute the resized ratio that’s needed to preserve the aspect ratio.
In this scenario, since we want our image to have a width of 600 pixels, to conclude the ratio between the new width to the old width, we must divide 600 by the old width. Which is accessed by using image.shape[1].
Then to define the new dimension of the image, as we already know the image will have a width of 600 pixels, the new height will be gotten by multiplying the old height by the ratio (line 19), which is then converted into an Integer. Allowing us to preserve the aspect ratio of the image.
After that’s done, to resize the image, we need to call the cv2.resize function which takes in as an argument:
- The image we want to resize
- The computed dimension for the new image
- Finally, the interpolation method, which is the main algorithm behind the process of resizing the image.
Let’s have a look at the result:

Now we have seen how to actually resize the width preserving the aspect ratio, can we do the same process for the height?
Well you bet.
All we need to do is to change the way the resize ratio used to maintain the aspect ratio of the image.
27 28 29 30 31 32 33 34 35 | # resize the image to have a height of 400 pixels ratio = 400.0 / image.shape[0] dimension = (int(image.shape[1] * ratio), 400) # perform the resizing and waits for any key to be pressed resizedImage = cv2.resize(image, dimension, interpolation=cv2.INTER_AREA) cv2.imshow("Resized image - Height", resizedImage) cv2.waitKey(0) cv2.destroyAllWindows() |
We redefined the ratio to determine the new height (400 pixels) with the old height.
Then, we reinitialized our new image’s dimension by multiplying the old width by the calculated ratio, and the height remains at 400 pixels.
On lines 32 and 33, the main resizing happens, which is then displayed towards our screen.

How do you Choose an Interpolation Method?
You might have come across the interpolation argument being passed while calling the cv2.resize command or during one of the classes you’ve taken back in undergraduate. So what exactly does this term define?
According to Wikipedia:
Interpolation is a method of constructing new data points within the range of a discrete set of known data points. Image interpolation refers to the “guess” of intensity values at missing locations.
Wikipedia
Now, rewiring your mind to project the definition towards images, you can refer to interpolation as a method that decides which pixel gets the value based on its neighboring pixel either when increasing or decreasing the size of the image.
Luckily for us, OpenCV provides a couple of different interpolations methods while maintaining our image’s aspect ratio during resizing.
Before diving deep into these interpolation techniques OpenCV provides for us: first, let’s make a new script, naming it opencv_resize_interpolation.py, and insert the following code:
1 2 3 4 5 6 7 8 9 | # import the necessary packages import argparse import cv2 # initialize the argument parser and establish the arguments required parser = argparse.ArgumentParser() parser.add_argument('--image', required=True, help='Path to image') args = vars(parser.parse_args()) |
Here we imported all the required python packages needed for this project; initialized our command line argument; loaded the image into memory then displayed our experiment image to screen.

38 39 40 41 42 43 44 45 46 47 48 49 50 51 52 53 54 55 56 57 58 59 60 | def resize_image(image, width=None, height=None, inter=cv2.INTER_AREA): # check if the width and height is specified if width is None and height is None: return image # initialize the dimension of the image and grab the # width and height of the image dimension = None (h, w) = image.shape[:2] # calculate the ratio of the height and # construct the new dimension if height is not None: ratio = height / float(h) dimension = (int(w * ratio), height) else: ratio = width / float(w) dimension = (width, int(h * ratio)) # resize the image resized_image = cv2.resize(image, dimension, interpolation=inter) return resized_image |
Looking into what interpolation methods are available, OpenCV provides to us five interpolation methods, which are:
cv2.INTER_NEARESTcv2.INTER_LINEARcv2.INTER_AREAcv2.INTER_CUBICcv2.INTER_LANCZOS4
63 64 65 66 67 68 69 70 | # initialize different interpolation methods interpolation_methods = [ ["cv2.INTER_NEAREST", cv2.INTER_NEAREST], ["cv2.INTER_LINEAR", cv2.INTER_LINEAR], ["cv2.INTER_AREA", cv2.INTER_AREA], ["cv2.INTER_CUBIC", cv2.INTER_CUBIC], ["cv2.INTER_LANCZOS4", cv2.INTER_LANCZOS4] ] |
You might wonder what exactly does each of these interpolation methods does and when exactly should you use which?
Well, let’s have a look at each one of them:
73 74 75 76 77 78 79 80 | # iterate over different interpolation methods for (inter_name, method) in interpolation_methods: resizedImage = resize_image(image, width=image.shape[1] * 5, inter=method) cv2.imshow(f"{inter_name}", resizedImage) print(f"[INFO] Interpolation method: {inter_name}") cv2.waitKey(0) cv2.destroyAllWindows() |
cv2.INTER_NEAREST: a nearest-neighbor interpolation method works well when resizing a larger image into a smaller one.cv2.INTER_LINEAR(used by default): a bilinear interpolation method outperforms thecv2.INTER_NEARESTtechnique while down-sampling the image.cv2.INTER_AREA: Similar to thecv2.INTER_NEARESTmethod when down-sampling the image; however, the nearest-neighbor interpolation works much better than this method.cv2.INTER_CUBIC: a bicubic interpolation over a 4×4 pixel neighborhood that yields outstanding results when up-sampling your images.cv2.INTER_LANCZOS4: a Lanczos interpolation over 8×8 pixel neighborhood. Which performs the same task as the bicubic interpolation method; however, it’s slow and resource-intensive.
Let’s have a look at the outputs when we try to up-sample the original image using different interpolation methods:


4x4 pixel neighborhood.
8x8 pixel neighborhood.Display OpenCV Resize Result
Now that’s implemented, it’s time to run our script. So, fire up your terminal, and execute the following command:
1 2 | $ python3 opencv_resize.py --image images/tony_shark.jpg $ |
The output we’ll get should match the results in the previous sections shown above.
Summary
This article has explained how to properly resize an image while preserving the aspect ratio of the image. We also explored different interpolation methods OpenCV provides for us and when exactly to use them.
What’s Next?
Now, what’s next? in the following tutorial, we will explore the library OpenCV’s functionalities. Until then, share, like the video above, comment, and subscribe.
Further Reading
We have listed some useful resources below if you thirst for more reading.
- How to translate an image using OpenCV and Python
- Drawing (Rectangles, Circles & Text) using OpenCV
- How to Split an Image into 4 Pieces OpenCV
- How to Read and Display an Image using OpenCV
- 3 Rookie Mistakes People Make Installing OpenCV | Avoid It!
- Why is Python the most popular language for Data Science


